Getting Started
For all services:
To use SOTAmāt you need to:
- Register for a new account on this web site. You MUST use your callsign as the Username!
- Set up your Web Profile for using 2-way commands (via SMS/eMail/Garmin-inReach). You do this by clicking on your callsign in the upper left corner of the screen, then read the instructions on that page.
- Define a PIN code
- (Optional) list cell phone numbers that will be used to automatically log you in (identify you) when sending SMS commands to SOTAmāt
- Prepare your configuration for 1-way commands (via HF)
- Select a set of SOTA Regions or POTA Locations you plan to work
- Select a set of modes, bands, and frequencies you want available when activating
- Define a set of SMS messages and recipients you want to be able to send while activating
- Your web account starts in a ‘pending’ state until checked by the an automated validation step to make sure you are not a spammer. Most hams are automatically approved in less than 10 minutes after the automated system looks you up in various amateur radio databases. Some people don’t pass the automated “you look like a ham operator” test. Those people need to contact the Administrator (support email address on this site). If you do pass, you’ll get another email saying you’ve been approved.
- Read the sections below on using and testing 1-way and 2-way commands
- Welcome to SOTAmāt!
Learn 2-way commands (SMS/eMail/Garmin-inReach)
These are the commands available when you DO have internet or satellite service. Read about using 2-way commands.
Learn 1-way commands (via HF):
These are the commands available when you DO NOT have internet or satellite service available. You will send a message via HF radio to monitoring stations that will pick up your command and execute it.
Tutorial videos to get the basic concepts:
- SOTAmat Getting Started with 1-way Commands – this is the latest step-by-step tutorial for beginners that uses the latest V1.1.0 (build 46) of the app. The video makes it look like a lot of work to use the app because it shows a lot of optional problem solving techniques that aren’t normally required. Once you have some practice a real activation is quick and easy and rarely needs all the extra steps shown in this video (you’ll rarely need clock sync, audio level adjustment, Android configuration “blobs”, multiple bands, USB/LSB, RBNhole alerts, etc.). But it is better to learn at home than need a work-around in the field and not know how!
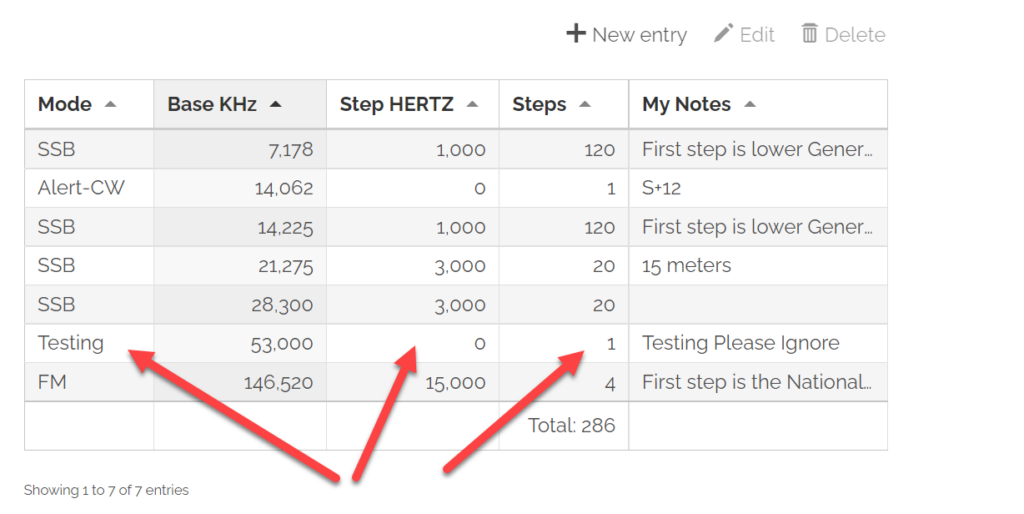
NOTE: at video timestamp 6:57 you can see I correctly configured the “Testing” mode to have just 1 frequency “step” at some random base frequency (53MHz in the video). The base frequency needs to be a valid amateur frequency so that SOTAwatch’s API will accept the test (14,000 will be rejected but 14,001 will be allowed). I used 53 MHz since it is valid, but fewer people subscribe to that band and thus the Testing spot won’t alert/bother as many users worldwide.
At the video timestamp 15:40 you’ll see I show a list of frequency steps (many more than 1 step). This is not the correct way to use “Testing” since you only need 1 frequency for testing and you don’t want to use up your 1 Million combinations with useless additional “Testing” frequencies. The reason I added multiple testing steps in the video at 15:40 was to simulate what the experience would be if I was making a real spot rather than a “Testing” spot. Mimic what you see at 6:57 and not what you see at 15:40 when using a “Testing” spot. - How SOTAMAT works, and how to use it – A relatively recent (but very long!) video (scrub it and skip to parts you care about). While recent-ish, this video doesn’t show the very latest features such as built-in FT8 audio found in version V1.1.0. What it does show is the inner workings of SOTAmat and how callsigns are encoded. Understanding the theory of operation helps some users be more effective.
- Older Videos of prior versions: these videos give tips for users who want to use a direct cable connection between their mobile phone and their radio. I no longer use a direct-cable connection since I just play the phone speaker into the radio’s microphone cable-free.
- SOTAmāt Tutorial – the video is based on an old version of SOTAmat that required a 3rd party app. The current app is much easier to use and has built-in FT8 audio generation. Still, this video teaches the key concepts. Note: step size is now measured in Hertz and not KHz as shown in the video.
- SOTAmāt Digital Modes for Beginners – as above, this video is out of date with the current app (things are easier now), but it teaches you several concepts that still apply.
- Third Party Videos – I didn’t make these videos. They are SOTAmat users who have their own tips and tricks:
Then install the SOTAmāt mobile app:
- Official Production Version: V2.1.0 build-100
- Apple App Store for iOS: 2.1.0-100,
- Google Play Store for Android: 2.1.0-100,
- Android APK and AAB files: 2.1.0A-100.
- Amazon Appstore (Kindle Fire, etc.)
- Beta Test Versions: Help me test!
- iOS:
- First install Apple’s “Test Flight” on an iOS device,
- then click here: SOTAMAT while on an iOS device
- Android: Google Play Store Beta Test:
- On an Android device click here,
- scroll down and join as a “beta tester”, and wait several minutes until Google updates the icon showing you’ve been added to the Beta tester list
- Assuming you have the old build 46 installed, and want to upgrade to the latest Beta build:
- go to your account icon in the upper right of the Google Play store
- “Manage apps & device”
- Find SOTAmat in the list and update to the new version.
- iOS:
Testing 1-way HF commands before a trip
SOTAmāt is easy to use once you understand it, but there are details to learn and practice with. Mountains are not forgiving, so practice at home until you get the hang of it.
Assuming you have done the preparation steps above (created an account, defined a configuration, loaded the configuration blob into your mobile app, watched the intro videos, etc.), here are steps to test the 1-way HF service from home:
- Try instructing SOTAmāt to send you a predefined eMail (or SMS) message
- Note that SMS only works from certain countries due to cost (If you want SMS enabled for your country and are willing to support the cost let me know). Costs are documented on the Twilio global SMS pricing page. eMail works for all countries and costs me nothing.
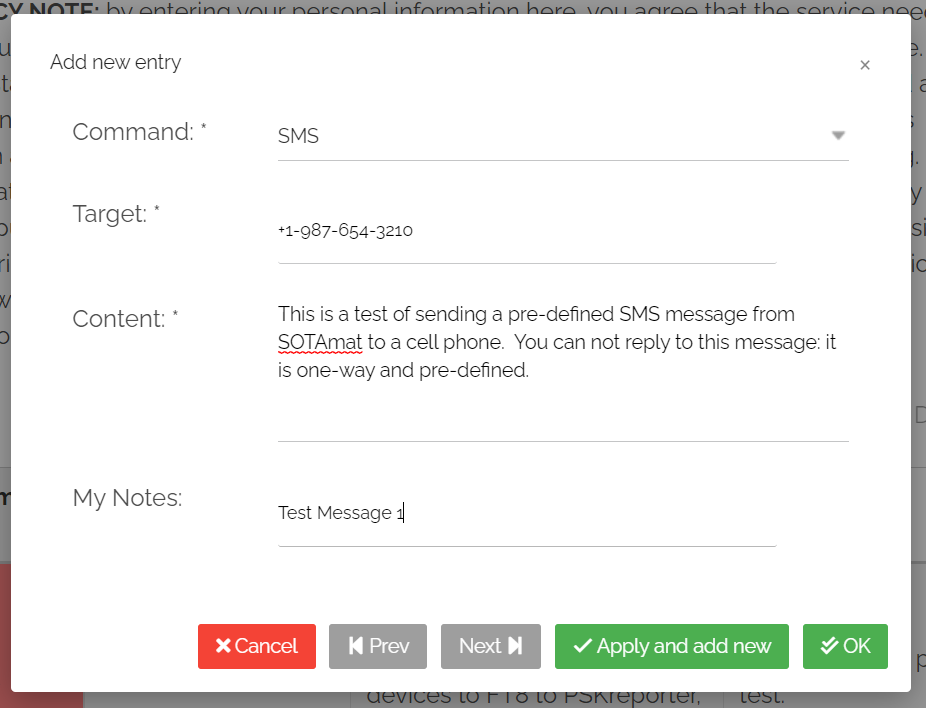
- On this web site, use the “Commands” menu to author a set of predefined eMail (or SMS) messages and recipients. You can configure "I'm OK" and "I'll be late" and other messages you can later send to someone like a spouse. In addition, define a test message and set your own eMail address (or cell phone number) as the “target” recipient. See the screen shot below.
- Since you just made a change to your configuration, you need the server and your mobile app to be in sync. So you need to load your new (changed) configuration into your mobile app from this web site. In the SOTAmāt app, under the Setup tab, you’ll login with your SOTAmāt username and password, and then click the “Load Configuration” button. Do this every time you change your configuration on the SOTAmāt web site. Remember: the mobile app is designed to work offline: it doesn’t check to see if your configuration has been updated: you must do it manually.
- Go outside with your radio and select your test message in the mobile app. Send the computed FT8 message 3 or 4 times and wait up to 6 minutes for your cell phone to receive the predefined test message! The delay is mainly caused by the 5 minute queuing system of the PSKreporter network.
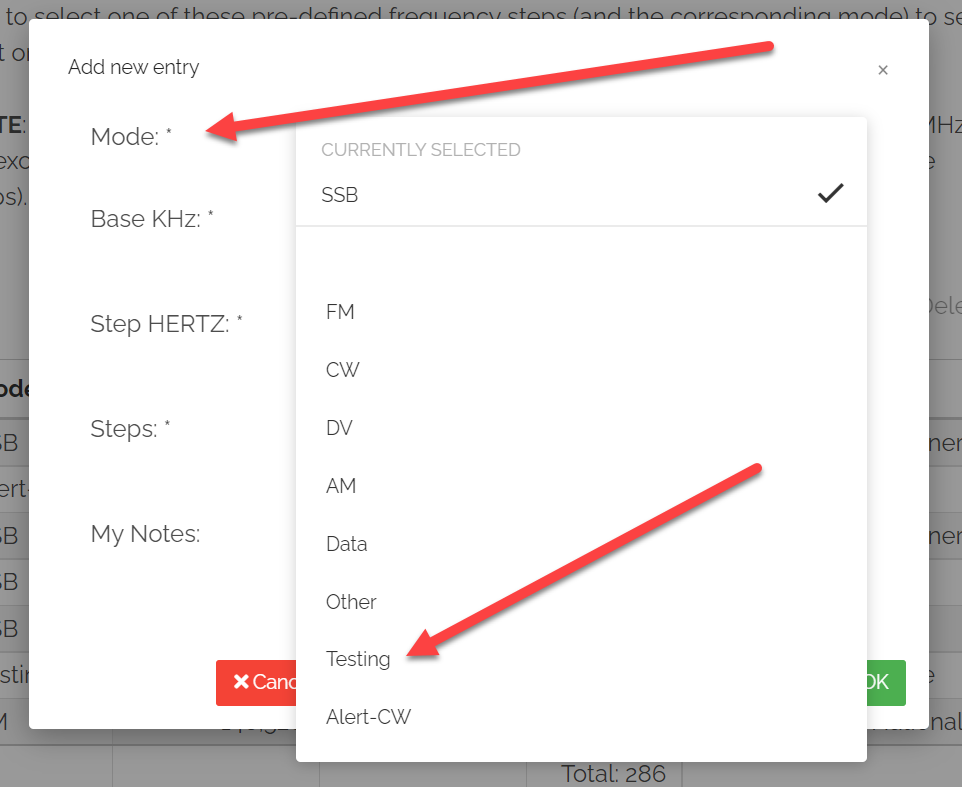
- The second testing approach is to define a “Testing” mode in the Frequencies-and-Modes preparation screen. One of the “modes” (beyond CW, FM, SSB, AM, etc.) is “Testing”. When executed the “testing” mode will post a real spot on SOTA Watch or the POTA App (so everyone will see it there, including you).
NOTE: the SOTA Org’s API will reject your test spot if the frequency you use is considered “bogus”. For example, if you post a test spot on 7.000 MHz it will be rejected, but 7.001 will work. I suggest you use a test frequency of 53.000 (which is valid in the middle of a band, and less likely to gather international attention).- When posted, “testing” spots are given these important settings:
- it will list the mode as “OTHER”, and
- it will automatically add comments on SOTA Watch saying “
Testing Ignore”. - if it is POTA, it will automatically post to the “K-TESTING” park ID.
- Just like with the SMS example above, since you’ve changed your configuration on the web site, you need to load the new “configuration blob” into the mobile app. The server and the mobile app have to stay in sync and use the same configuration.
- Finally, use the mobile app to send the command via FT8. To do this you select a real SOTA Peak ID or a POTA Park ID (you can’t use a bogus ID since the SOTA/POTA systems will reject it), and then select your “Testing” frequency/mode,
- When posted, “testing” spots are given these important settings: