
SOTACAT
Quick tools for Returning Users:
New User Introduction
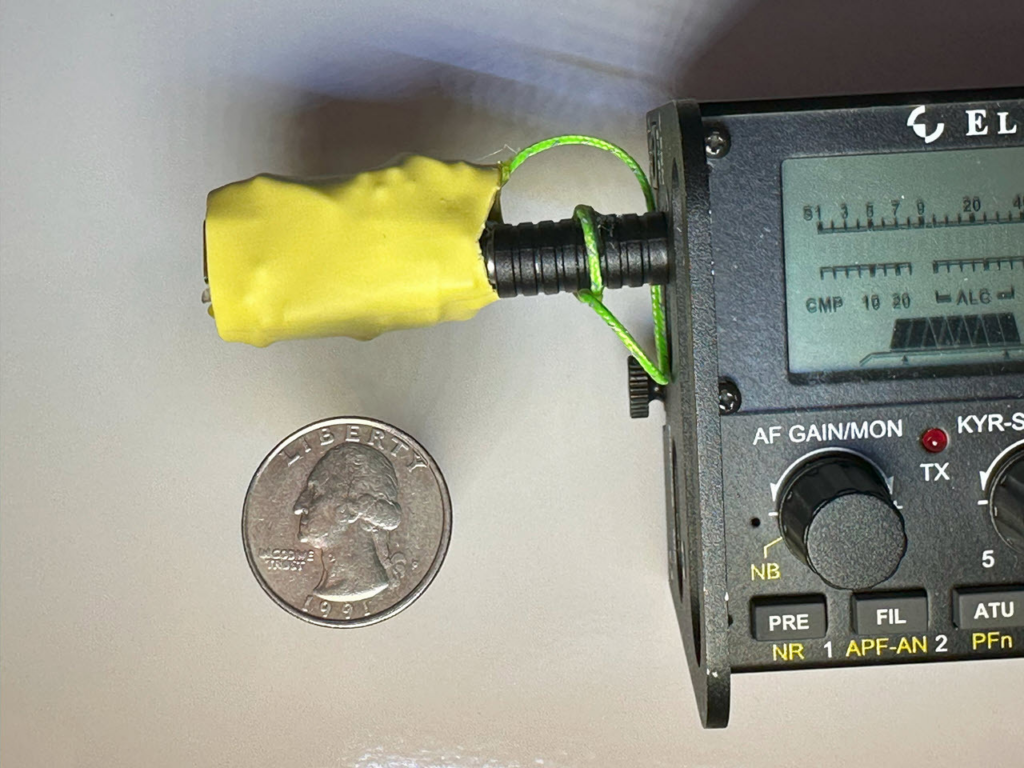
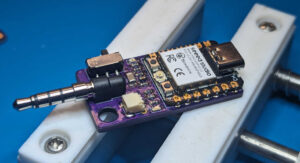
SOTACAT is a small hardware module that plugs into an Elecraft KX2, KX3, or KH1 radio’s CAT port (Computer Aided Transceiver port, also known as a “serial port” or an “accessory port” or “ACC port”) and provides WiFi control of the radio from your mobile device. It provides the following features:
- Control your radio from a web page on your phone:
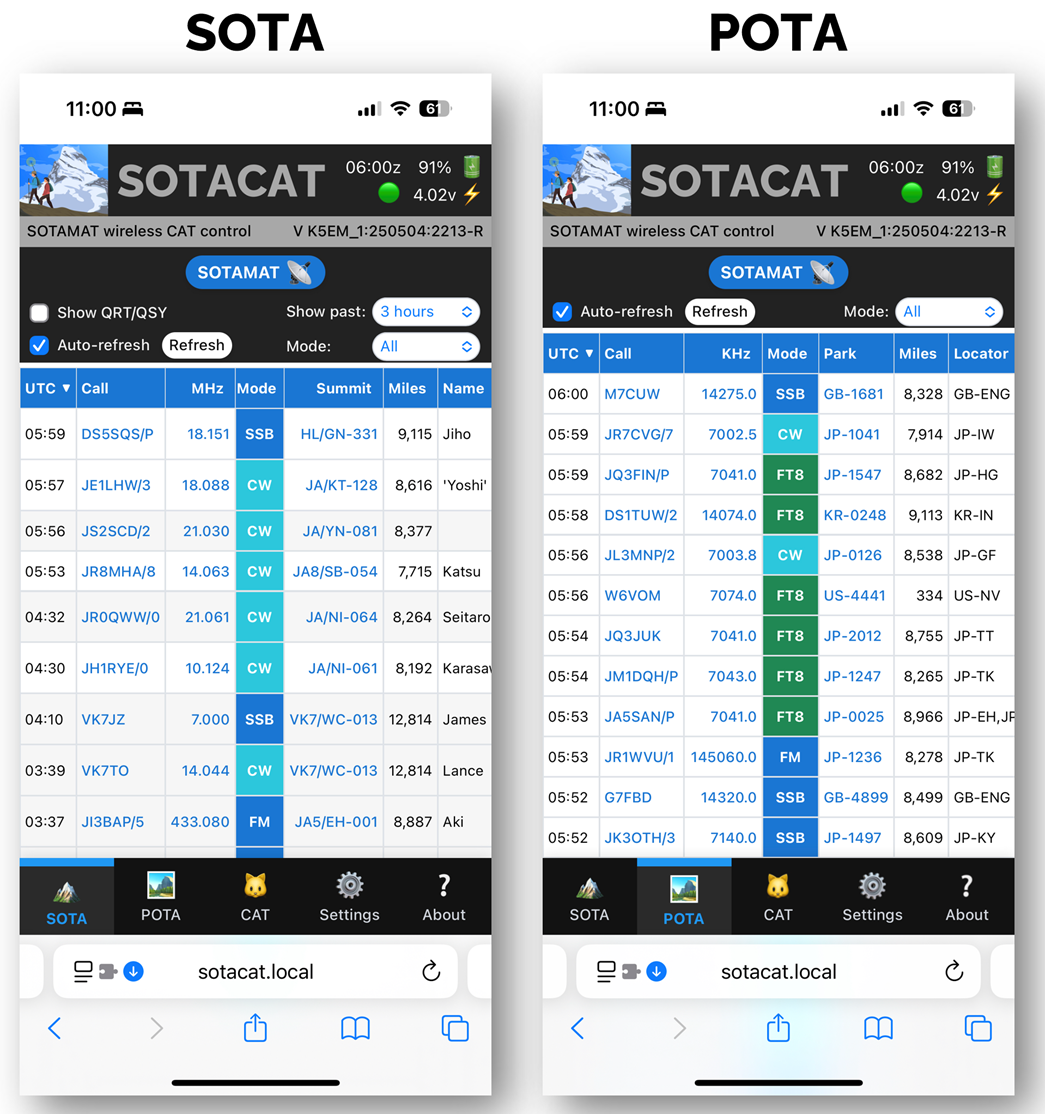
The SOTACAT acts as a WiFi hotspot in the field with its own web server and mini web site. Connect your mobile device to the WiFi SSID “SOTACAT_xxxx“, in the field or at home and then use your phone’s browser to navigate to http://sotacat.local (Android users might need to use http://192.168.4.1 instead if your phone doesn’t support mDNS / Bonjour Service). You’ll see a web site that can control your radio! - SOTA/POTA Click-to-Pounce:
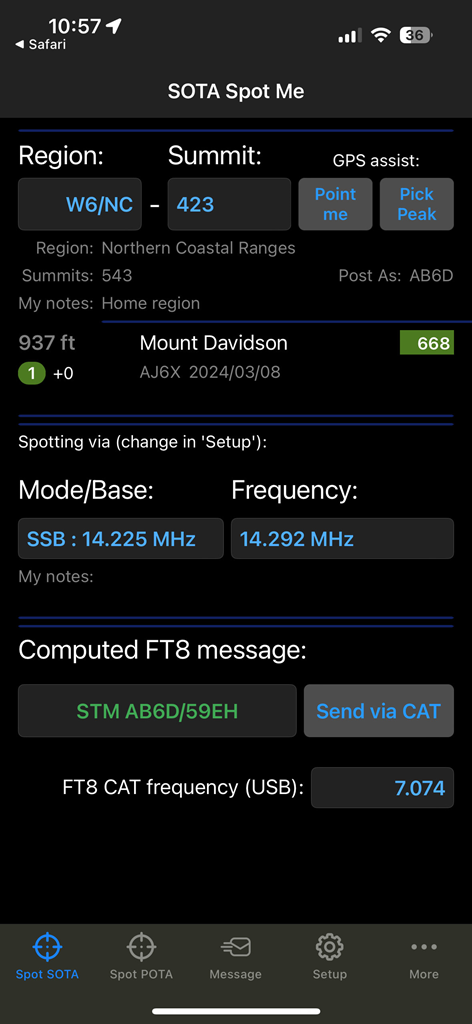
When cell service is available, it allows SOTA and POTA operators to “click-to-pounce” from your mobile device. You’ll see a list of current SOTA and POTA spots and clicking on any spot automatically tunes the radio to the correct band, frequency, and mode to start a contact with that operator. - SOTAMAT spotting over HF with direct FT8 Synthesis (audio free!)
Rather than playing FT8 audio from your cell phone speaker into your radio’s microphone, SOTACAT allows you to self-spot with SOTAMAT by teaching the Elecraft radio to directly synthesize FT8 signals audio-free. This is direct FSK without any audio signal, microphone, or audio cables. SOTACAT accepts FT8 message strings from SOTAMAT (or any other app via a SOTACAT WiFi REST API) and computes the FSK encoding required to implement that FT8 message. The cell phone’s clock is used to get the FT8 timing correct for transmission by the Elecraft radio. - Additional SOTAMAT integration:
SOTACAT forms a bidirectional connection with the SOTAMAT app on your phone allowing SOTAMAT to read what operating frequency and mode you have selected and automatically picking the closest setting from your SOTAMAT configuration. Making a change to SOTAMAT’s frequency / band selector will, in turn, adjust the radio’s operating frequency/band/mode. Once you enter your peak or park ID (or use the automatic peak/park selector via GPS), SOTAMAT will use the SOTACAT to send the proper FT8 message to self-spot, self-alert, or send an SMS/eMail message command. It easily allows your operating band to be different than your FT8 self-spotting band: the SOTACAT will automatically do all the work!
Current status
- The following are available on GitHub:
- Written instructions for manually building your own SOTACAT, including the Bill Of Materials / Parts List, Schematic, and Assembly instructions
- Firmware
- YouTube build instructions video showing how to manually build your own SOTACAT
- Buy a professionally manufactured and assembled SOTACAT from K5EM: https://store.invertedlabs.com/product/sotacat/
Installing Firmware
There are two ways to load firmware into your SOTACAT:
- Using a direct USB cable connection from your computer to your SOTACAT. The first time you update your firmware, this is the recommended approach to ensure your firmware gets the proper OTA logic. Subsequent updates to your firmware can be done with either approach. Note that using the direct USB cable approach will do a full factory reset of all settings, and you’ll have to re-configure your WiFi settings at a minimum.
- Using an “Over-The-Air” OTA approach where you first download the firmware *.BIN file from this web site to your cell phone, and then use the SOTACAT’s user interface to select the OTA BIN file from your cell phone and wirelessly upload the firmware BIN file to your SOTACAT. The advantage of this approach is that your SOTACAT configuration settings are normally maintained after the update.
Firmware update using a direct USB cable
You can load the latest official software (known as “firmware”) into your SOTACAT as follows:
- Visit this page with a supported web browser. Only the following browsers support the required “Web Serial” standard:
- Google Chrome
- Microsoft Edge
- Opera
- Connect the SOTACAT to your computer with a USB cable. Many USB cables only support charging and lack the extra wires needed for transferring data. If the steps below don’t work, try again with a better (often thicker) USB cable.
- Once powered on your SOTACAT will go to sleep after 60 seconds without a connection. You have 1 minute to complete the following tasks.
If your device goes to sleep, you might see an error message later such as “Failed to initialize.” To correct, just turn your SOTACAT off, and then repeat the steps from the beginning. To turn off your SOTACAT you not only need to unplug it, but also turn off the power switch (if it has one), and unplug the TRS-to-TRS 3.5MM adapter (if it has one). - Click the “Connect” button at the bottom of this page, and you will see a list of serial ports (COM ports) that are installed on your computer. The list for your computer will look different from this example.
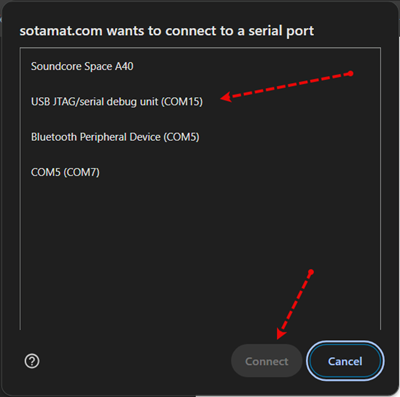
- Select the serial port from the list that is most likely to represent your SOTACAT. This may take some experimentation. In the picture above, it is obvious since only one choice is for “USB JTAG“, but your computer might have multiple possibilities. If you don’t see an appropriate option, it is likely you either have a charging-only USB cable, or your SOTACAT is not turned on.
- Click the “Connect” button at the bottom of the serial port selector.
- At this point your web browser will attempt to communicate with your SOTACAT module. You should see a new menu appear like this:
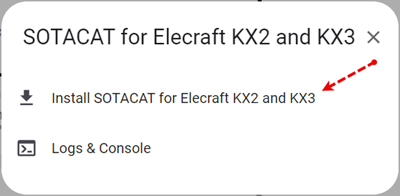
- Click on the “Install SOTACAT” option.
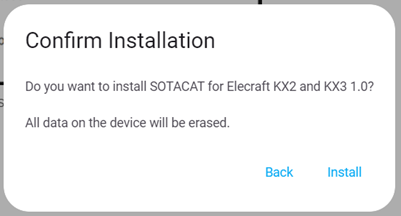
- At the “Confirm Installation” prompt, click on the “Install” button:
Firmware update via OTA (Over-The-Air)
Note that this option should only be used after you have used the “Direct USB Cable” firmware update approach at least once. Doing a direct USB cable firmware update will do a factory reset and erase all configuration settings.
Future firmware updates can use this OTA approach, which will normally preserve your configuration settings.
- Connect to your SOTACAT and cell phone via WiFi.
- Visit the top of this page on your cell phone and click the OTA download button to download the firmware BIN file to your cell phone.
- In your browser, navigate to the SOTACAT’s web user interface and go to the “Settings” tab. Select the OTA Firmware Upload button.
- Select the BIN file you downloaded earlier. It will upload to the SOTACAT and the SOTACAT will reboot.
Configuration after firmware installation
- Turn on your SOTACAT: if your SOTACAT doesn’t have a switch, then plug in the TRS-to-TRS 3.5mm adapter to turn it on.
- On your cell phone connect to your SOTACAT’s WiFi hotspot. It will have an SSID in the form of “SOTACAT-xxxx” (where the “xxxx” is the serial number of your device) and an initial password of “12345678”
- Open a web browser on your cell phone and navigate to the SOTACAT URL (note: do not use HTTPS, SOTACAT only supports HTTP connections):
- iOS/MacOS/Windows: use “sotacat.local”
- Android: “192.168.4.1“
- Once the web page appears, click on the “Settings” button at the bottom of the page.
- You will see a form with three pairs of WiFi SSID’s and Passwords. When the SOTACAT boots it will try and connect to these in order:
- Client 1 – Normally this would be configured with your home network SSID and password, but since your home network isn’t going to be available in the field, this is optional and you can fill it in with the “Client 2” settings. Adding a home network is useful if you want to control your radio from any device with a browser on your home network.
- Client 2 – Normally this would be configured with your cell-phone’s “hotspot” SSID and password. On Android it is required to have the SOTACAT connect to the Android phone’s hotspot because Android doesn’t support split networking. If you are an iOS user, this is optional as you can either have your phone connect to the SOTACAT (with split networking), or you can have your SOTACAT connect to your iOS hotspot. On iOS I like to configure Client-2 with my hotspot settings so that I can operate either way in the field.
- Server – in the field when the SOTACAT can’t connect to Client 1 or Client 2, it will advertise itself as a WiFi hotspot server using this SSID and password. This is the same SSID you initially connected to in order to get to the “Settings” screen. Here you can change the default settings/password for the SOTACAT’s hotspot server, or leave them as the defaults (SSID “SOTACAT-xxxx” and password “12345678”).
- On iOS/MacOS/Windows this is the normal way to connect to the SOTACAT for both field operation and for configuration duties. Your iPhone connects to the SOTACAT’s hotspot device via WiFi while at the same time the iPhone is connected to the internet using cellular data. This WiFi + Cellular is called “split-networking” and is not available on Android. The advantage of “split networking” is that everything is simplified (you don’t need to remember to turn on your phone’s hotspot, you don’t need different types of connections for operation vs. configuration, and you don’t need to change as many settings).
- On Android you only connect to the SOTACAT’s hotspot when you need to change the SOTACAT’s configuration. To operate in the field the SOTACAT has to connect to the phone’s WiFi hotspot and not the phone connecting to the SOTACAT’s hotspot. This is because Android does not support split networking.
Click save to store your settings and reboot the SOTACAT.
Android users have one additional step because Android does not have mDNS / Bonjour support built-in. You will need to install the app called “Bonjour Browser” from the Google Play store onto your phone. This app will be used to connect to your SOTACAT in the field. The purpose of the mDNS/Bonjour app is because when the SOTACAT connects to your Android hotspot, the Android device will randomly assign an IP address to the SOTACAT’s network connection. When you want to open a browser on your phone to see the SOTACAT user interface, you need to provide this IP address to the browser so that the browser knows what device you want to view. But since Android picks a random IP address, we have no way of knowing what address to use in the browser. The analogy is if a person named “Bob” is randomly assigned a room in a hotel. Now imagine you want to call “Bob”. You don’t know what room number to call unless “Bob” has a way to communicate with you. That’s what mDNS/Bonjour is: a way for Bob to post his room number on a public bulletin board where everyone can see it. Android doesn’t have a way to view the bulletin board, and the “Bonjour Browser” is an app that teaches Android how to look at the bulletin board.
Using SOTACAT in the field
Once you’ve configured the device (as instructed above) here is the process in the field:
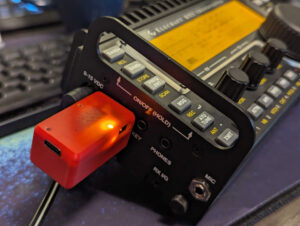
- Turn on your Elecraft Radio
- Turn on the SOTACAT (slide the power switch, or plugin the TRS to TRS 3.5mm plug) and plug it into the Elecraft radio within 60 seconds.
- When you initially turn on the SOTACAT one solid LED indicates attempts to talk to the Elecraft and turns off when the Elecraft connection is made, and the other solid LED indicates attempts to connect to the cell phone and turns off when the phone connection is made via WiFi.
- If neither LED is on or flashing, it means the SOTACAT entered deep sleep mode to conserve battery due to inactivity. You have to turn the SOTACAT off and back on, and then have it connect to your phone and to the Elecraft within 60 seconds.
- On iOS:
- Your iPhone should not see your home WiFi when away from home, and instead should connect to the SOTACAT’s hotspot “server” you configured above. This is assuming you didn’t do the (optional) configuration of the SOTACAT Client-2 with the iPhone hotspot info, and/or assuming you didn’t (optionally) turn on your iPhone’s hotspot.
- At this point your iOS device is connected to the SOTACAT via WiFi and possibly to the cellular data network if you have cellular service in your operating location. (Split networking).
- When connected to the Elecraft and to the phone over WiFi, both LEDs should now turn off, followed by one of the LED’s flashing at regular intervals.
- On your iPhone open a web browser (ex. Safari) and navigate to the URL “sotacat.local”. You should see the SOTACAT user interface appear.
- On Android:
- Enable your Android phone’s hotspot, making sure the Android phone’s SSID and password are what you programmed into the SOTACAT earlier (normally “Client-2” if “Client-1” has your home network settings).
- The SOTACAT should connect to the Android hotspot, and both LEDs should now turn off, followed by one of the LED’s flashing at regular intervals.
- Launch the “Bonjour Browser” app you previously installed on your Android phone. It should display the SOTACAT as a device found on the local WiFi network, including the randomly assigned IP address. Click on the “SOTACAT” entry in the list and the “Bonjour Browser” app will launch your default web browser to the SOTACAT URL. The SOTACAT user interface should appear.
If you have cellular service in the field, the SOTACAT user interface should show a list of recent SOTA and POTA spots. You can “Click-to-Pounce” on any of these activators and it will automatically tune your Elecraft to that activator’s spot information.
You can use the “CAT” tab in the user interface to control your radio from your phone. For example, you can play your pre-recorded voice messages or CW messages over the air. I like to record “CQ SOTA, CQ Summit-on-the-Air, this is Alpha-Bravo-Six-Delta calling Summits-On-the-Air CQ” in my Elecraft memory and use the cell phone to play the message while operating standing up.
Using SOTACAT with SOTAMAT
The SOTACAT user interface allows you to launch SOTAMAT. If you launch SOTAMAT from SOTACAT then SOTAMAT will behave differently than if you launch SOTAMAT directly. When launched from SOTACAT the SOTAMAT app will connect to your radio wirelessly via the SOTACAT and allow these additional features:
- When launched, SOTAMAT will look at the radio’s current VFO and mode, and will attempt to find a matching Frequency and Mode in your SOTAMAT pre-defined configuration. If a match is found, the SOTAMAT UI will automatically select the matching configuration setting.
- If you select a Mode and Frequency in SOTAMAT from your configuration, it will send that Frequency and Mode to the radio and change your VFO to match your selection in SOTAMAT
- If you turn your VFO dial on the radio, or change modes on your radio, or change bands on the radio, then SOTAMAT will again search for the closest match in your pre-defined SOTAMAT configuration and selects it into the UI.
- On the SOTAMAT spotting tabs (for SOTA and POTA), you will see an additional option for which FT8 spotting frequency you want to use. You can select one of the pre-defined frequencies from the list and the frequency does not need to be on the same band as your operating frequency. I recommend that you use 14.074 or 7.074 MHz to self-spot, regardless of your operating frequency since that is where most FT8 Skimmers are listening.
- If you use SOTAMAT to self-spot SOTA or POTA, the FT8 transmission will not use audio when in SOTACAT mode. With a SOTACAT enabled SOTAMAT will send the FT8 by teaching the radio to directly synthesize the FT8 message by rapidly changing the VFO when sending a CW tone to produce the FT8 FSK signals. Once the FT8 message has been sent (possibly multiple times) the radio will return to your prior operating frequency and mode.